Saturday, May 31, 2014

Outnumbered!

Your line has failed to prevent the enemy's decisive action, but have cost them a number of lives. It is left to you as the last hope of victory against staggering odds. You've survived this much, what could the last few of them do? You charge strait in, glory just a few swings away. The five of them in range swing at you, obliterating any hope of success, and deliver a few extra hits to make sure you are dead.

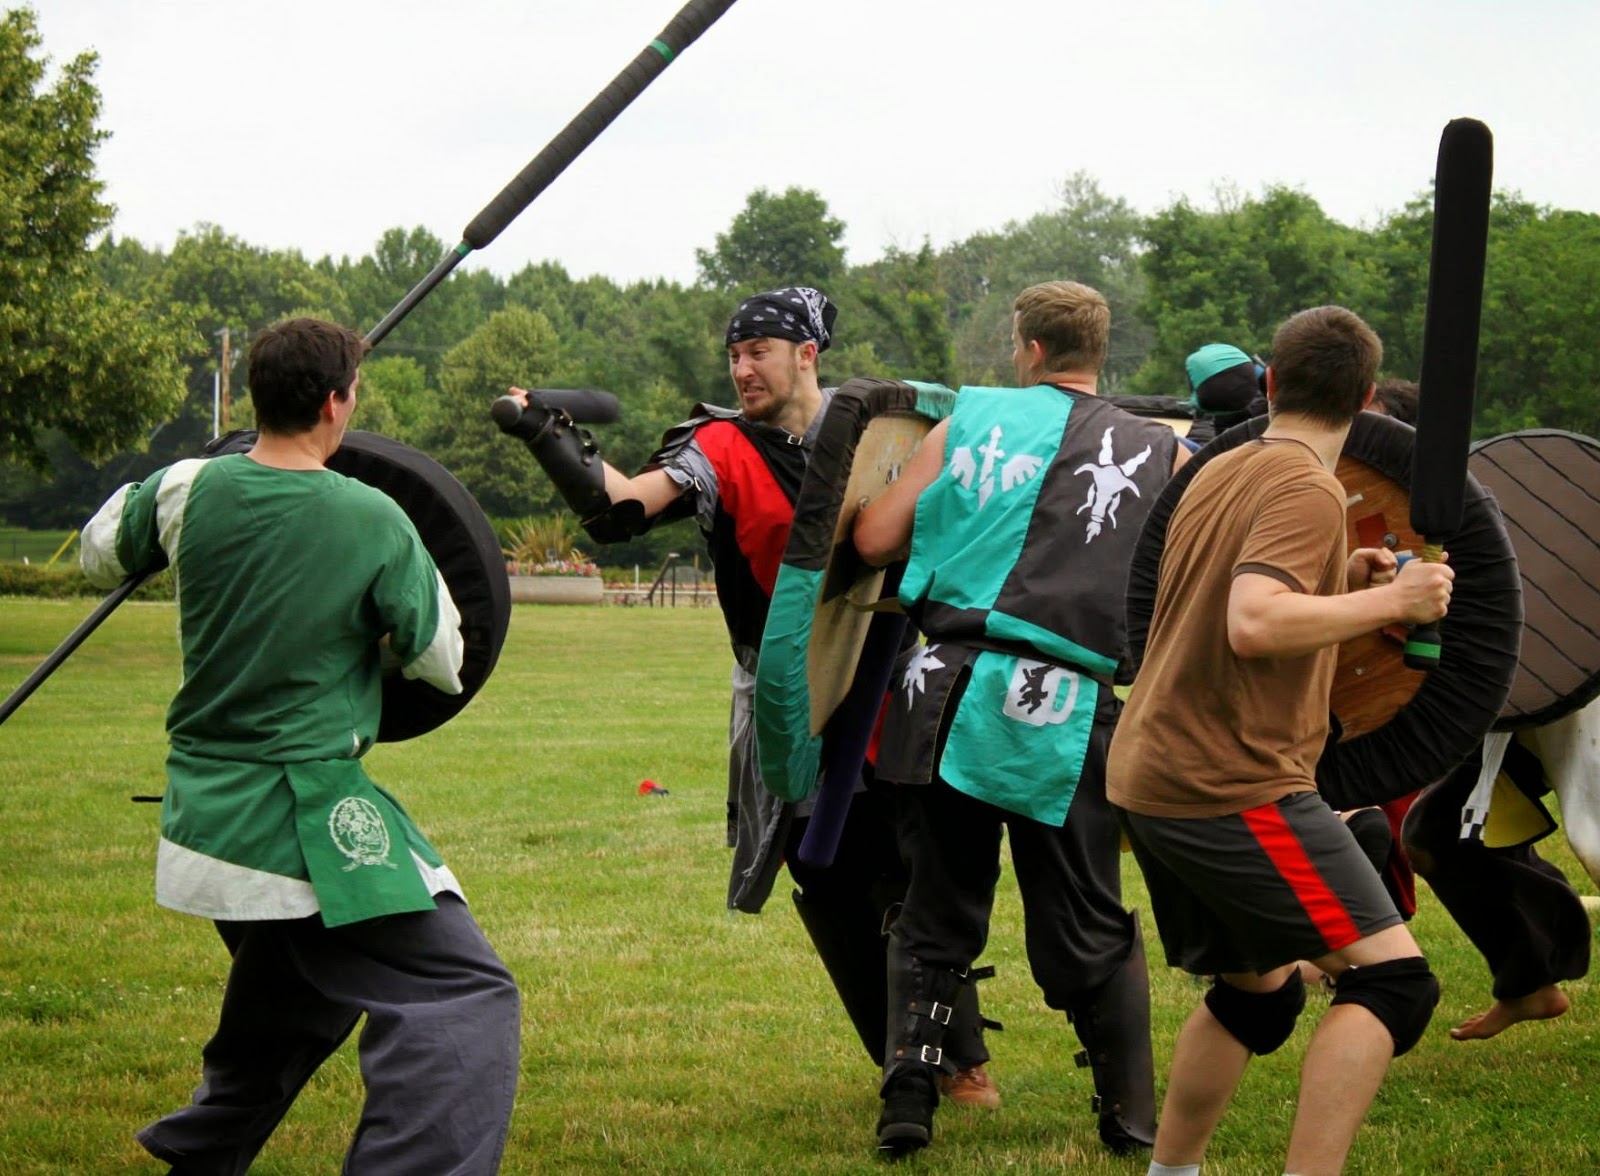
Fighting against two people seems hard enough, but outnumbered 3:1, 5:1, or even 10:1 are odds that can be overcome. It takes a good bit of time, energy, and a smidge of luck. Granted, one new guy against 10 veteran fighters probably won't stand much of a chance, but the strategies I present here would at least give him a little bit more hope.

The first thing to understand when fighting outnumbered is that a lot of people can swing at you. Fairly obvious. The goal is to reduce that number to something manageable, ideally one, but two being somewhat acceptable. The bulk of the effort required to win the fight is in maneuvering around their group, trying to catch someone out of the pack or get them into a single file line.

But wait a minute, how is the lone swordsman going to outmaneuver a pack of enemies? Well, that brings me to the other thing to understand about fighting outnumbered. People fight more cautious when they are in the pack. If each of them were reckless, it would leave more openings for you to exploit. Instead, the average Belegrim will stick together and try to keep the whole group facing you as a line.


Making the odds a little more even requires one of two things: forcing the enemy into their own way, or reducing their ability to keep up with you. By circling, you force their line to wheel about its center. If they want to keep a strait line, the fighters on the flanks have to cover a good bit of ground to keep up. By changing direction, you can often catch someone on the flank advancing too far, still trying to catch up to the rotation the other way. Even if they aren't open to a kill shot, tagging a leg or arm does help substantially over the course of the fight.

If you do manage to leg one of them, they may be forced to abandon their teammate as you move away, reducing how many people you have to fight. There is one danger, that you might lose track of the legged opponent(s) as the fight progresses.  As long as you are occasionally checking your surroundings, you should be able to draw the mobile fighters away from their injured comrades (which is hopefully a growing number).

As the pack begins losing mobility, legged opponents will clump up and the group begins having a hard time rotating. This will eventually lead them into forming a circle. If you had a teammate, the circle causes a number of potential vision gaps. Even solo, you may catch someone who is having difficulty tracking you as you reach the opposite side of the circle. Changing directions, in this case, may allow you to get a quick kill.

A note on aggressive groups: despite the fact that the group is pushing against you, you still have an opportunity to win, but with a great deal of effort. Instead of circling towards them, you need to circle away. As you backpedal, angle away from one flank or the other. That flank will have to push harder to circle past their line. In such a way, this is much the same fight, but with everyone on the move.

One other common scenario is when a large number of the enemy has been wounded and only a few mobile fighters remain on the team.  Often, those with mobility will fall back towards their wounded comrades, especially if a skilled fighter is about to fight them in the open.  They'd rather seek support than risk giving up their teams only mobility if they fail.  In this case, the outnumbered fighters might actually have an advantage, but are still in for a rough fight.


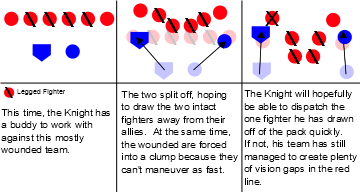
I use a 6 on 2 situation for an example.  A knight and one of his teammates are outnumbered, but facing four legged opponents and a couple of mobile ones.  If the mobile fighters had chosen to engage the knight and his friend in a 2 on 2, they would be at a disadvantage.  So instead, they choose to cover the flanks of their wounded allies.  In this case, the two outnumbered fighters split up, hoping to draw the two mobile fighters away from the wounded to fight them one on one.  If the knight can get one in the open, he should be able to kill them and then roll around to help his ally.  Even if he doesn't, with the two of them circling the pack, each one might find someone's back in the process because the enemy has to split their attention between them.  Once the mobile fighters are taken care of, it is a matter of slowly picking off the legged opponents while the two fighters circle around them.

The moral of the story: don't give up.  All those odds stacked against you just mean you are in for a hard fight.  If you lose, go down in a blaze of glory.  If you win, gain a sense of accomplishment.  Just keep fighting.

Next week: how to use numbers to your advantage; or how to prevent everything I just said from happening.

Thursday, May 29, 2014

Decisive Action: Weak Points

Last week I talked about gaps, but I forgot to mention weak points. Unlike a gap, a weak point is still defended, but offers a chance for a skilled/lucky fighter to push through. Also, they are good opportunities for support weapons to breakthrough with concentrated effort. Weak points allow a well organized group to cause high local attrition, and potentially a minor/major breakthrough.

Two new fighters post up just within sword reach of each other, leaving just enough space for a fighter to pass through. This isn't as spacing gap, because they are still within distance to cover the gap, but it is a weak point. The combination of good shield placement and good timing can allow a skilled fighter to push through unscathed. This is largely because newer fighters are less likely to cut off the advance and will stay in their positions as the shock trooper presses in.

Now, what if you were to put a spear user between those newer fighters? Problem solved, right? Well, sometimes. Outside of exceptional spear fighters, it only slows the advance down a little bit, and actually causes the shock trooper to have to act sooner, rather than standing in the spear's optimal range. It also will likely cause the new fighters to spread out a bit to give the spear some room. The shock trooper just has to get inside of the spear tip to turn this fight into the same type of fight as before.

Those of you that know me probably know this is one of my favorite weak points to exploit. It takes good timing and quite a few steps, but can sway the tide of a fight pretty quickly. It also has a high likelihood of getting you killed when you try it.  That being said, a solid push into the spear formation is going to give your team time to push up while they are occupied, and even against skilled opponents, there is still a good chance of doing some damage. 

That's me, rushing a spear, while trying to stab the adjacent knight with my down sword.  No one said it would be easy.
Photo by: Ellie Apland
Another weak point commonly seen is a section of the line that lacks shields.  Whether a number of fighters that have lost an arm, several florentine fighters, or some red users, they still are creating an opportunity for some attackers.  During the maneuver phase of a line battle (before anyone is in range to attack, except the stray arrow), spear and glaive users should position themselves to strike at this type of weak point.  The shieldless have much less defense against reach weapons and should be easier to cut down.  Arrows seem like an obvious choice to attack here as well, but the continuous pressure of a spear may be more suited to kill the weak point.

Then there is "the javelin guy".  Javelins are good for putting some threat out towards support weapons and killing high value targets, but they aren't going to help you much when you are being rushed.  Sometimes, a javelin user keeps their javelin aimed towards a polearm long enough that the enemy can get into range to rush them.  At this point, he either has to decide to throw/drop it and swap weapons, or try to survive by blocking with the javelin.  This becomes an especially good target if the fighter to one side or another is preoccupied or looking the other way.  I'm also not trying to say javelins are bad, but remind people that when you have one out, you are as much a support weapon as a lineman.  Try to keep yourself in a safe spot if you are going to hang onto it for a while.  Or don't, and I'll be more than happy to rush your way.

One last weak point for today, the range weak point.  What's this, a whole unit has short swords and no support weapons?  Well, I guess my team should pull out their long swords and polearms.  Any time you can simply outrange a group of enemies, it is going to help boost the attrition your side causes.  Much like the situation of shieldless enemies, bringing up polearms and other reach weapons gives your team a huge advantage.  By maintaining control of the range, your side can dictate the flow of battle and swing more aggressively, without being easily countered.

The whole goal of spotting a weak point is to figure out how to use it to cause as much damage as possible to the enemy.  You just need to out kill them locally in order to start gaining some advantage across the whole line.  A lot of the time, by applying concentrated pressure to a weak point, you will form a gap in their line, allowing you to crush their team.

When you notice a weak point in your own line, you need to either reinforce it, or fight defensively. During the maneuver phase, try to redress the ranks to spread shields to where they need to go and eliminate any other weak points you notice early. As far as smaller weak points go, they will be harder to notice until it is too late, but with any luck, a small bit of reserves will at least have a shot at preventing too much damage.  For the larger weak areas, playing it safe will buy some time for your own line to gain advantage elsewhere.  Because the enemies goal will be to kill you quickly, yours needs to be surviving.

Tuesday, May 27, 2014

Falling Back

People fall back from the enemy for all sorts of reasons.  Sometimes, it is the only tactically sound thing to do, other times it is probably the wrong thing to do.  In one on one fights, backing up to maintain your preferred range is just part of the range game.  In line fights, it can often set the flow of the fight for those around you as well, possibly even forming gaps or weak points in your line.

So why do lines back up?  Oddly enough, it is usually because the other guy is just moving forward without hesitation. Moving with confidence into a range the enemy isn't comfortable with makes them want to back up, just as though they are in a one on one fight. This is even true when a solo fighter presses up against a line, with little chance of fighting at even odds. It is a simple reaction driven into our mindset by countless rounds of sparring.

Of course, if one person backs up, the rest of the line will have a habit of doing the same. Overall, each fighter is working to maintain the line, and rather than leave a staggered gap or be caught alone in a kill pocket, they back up. It isn't the worst thing, at least the line is maintaining its coherency, but isn't always necessary.

There will also be times when falling back in good order is the only tactically sound option. Outnumbered, out armored, and facing a wall of spears, flails and tower shields, your only chance is to fight defensively and hope to buy your team time to win the fight elsewhere. You may also need to wait until the enemy leaves an opening for you to rush.

One other possibility is that it is a trap. Not too commonly, fighters will fall back to lure the enemy into advancing too far forward, into a kill pocket or staggered gap. When done right, with adequate support, it can be extremely effective. The section falling back may also be keeping your attention and positioning your back towards their flankers, which will soon arrive to kill you. If they are backing up with a grin on their face, its probably a trap.

The main point here is to be mindful of why you are falling back. Let the rest of the team know if you need help. Tell the other sections to push if you think yours can hold out on the defensive for a while. If you really can't think of a reason you and the rest of the line are falling back, try to rally them into holding their ground. Just don't use the phrase "hold the line", that word "HOLD" puts a stop to fighting.

Thursday, May 22, 2014

Decisive Action: Gaps

Many a line has met their doom because they failed to cover a gap, allowing a flood of enemies into their backfield to cut down the rest of the line. I talked a little bit about maintaining a strait line last week, but one always has to have an eye for gaps. Keep a watch for gaps in your own line and the enemy's.

The most obvious gap is a spacing gap. This usually occurs when wings or anchors fail to communicate or must cover a wider distance between the core and flank than they have the manpower to support. Fighters should avoid being separated by more than twice the distance between the lines to help reduce the chances of someone making it through the gap. Communication across the line and shoring up thin spots in the line early will prevent most instances of this type of gap.

Several other types are less apparent to the untrained eye. Stagger gaps and vision gaps are fairly similar, but stagger gaps are the extreme case. A vision gap is one that forms because two adjacent fighters are fixated away from each other, meaning neither of them are watching their middle. A decent fighter can push up quickly and kill one or both of them on their way through the gap. A stagger gap happens when both sides have vision gaps that overlap, causing the lines to stagger if one flank pushes.


The simplest cure for vision gaps is keeping your head on a swivel and using your peripheral vision watch the surrounding area. Staggered gaps give you two options, either exploit it to kill the enemy line, or fall back out of the danger. More often than not, the first side to recognize the danger will be able to utilize it to crush the enemy.

One other gap is the "L" or angled gap. This is more common to see when a larger force has been engaged by two smaller forces from different sides. Each flank of the larger group turns to face the respective enemy, forming an "L". Much like a staggered gap, this leaves a weak point in each line near the corner, especially when the smaller forces are only temporarily aligned to take on the large group. Angled gaps can also be seen near the edges of a kill pocket in extreme cases.


For this diagram, I assume the two smaller forces combined probably have more fighter in total.


Defense against angle gaps can be nearly identical to that of a kill pocket, backing away from the corner and extending the line to force the enemy into a strait line. This can be particularly effective when fighting two desperate allies, forcing their flanks to have to worry more about each other. Sometimes, it is entirely possible to have one wing wheel around the corner, towards the enemy. A successful push like this may even force them backward enough to get them into an angled gap. It also might form a staggered gap if the flank has to wheel about their center, rather than around the corner.

Obviously, gaps are dangerous. A good deal of the time, however, they are dangerous to both sides. Good battlefield awareness will let you spot them early and take advantage, or at the very least prevent the enemy from doing so. Just covering the gap can sometimes be enough to deter someone from pressing in against it. You'd be surprised at how often you'll go to kill a gap, only to meet an enemy about to do the same to your line.

Wednesday, May 21, 2014

Recruitment reminders

Summer is a great time to start planning for recruitment season (for those college town realms). I thought it might be good to write up a few tips on things to teach new fighters that might go overlooked. The basic rules rundown is always a must, but it is pretty easy to miss a few points here and there.

1) Emphasize safety. All too often we just give people the rules and expect them to understand that there is danger in being reckless, even with padded weapons. Headshots, flat hits, and wild swings are to be avoided.

2) Avoid the "new guy duck and sweep". Ducking towards an opponents leg is a pretty common move of new fighters. This causes a few things. They tend to raise their shield into their opponent's face, which isn't illegal, but is discouraged. Opponents will also regularly counter with a cross shot, which has a high chance of hitting them in the head. Teach new guys to bend their knees, rather than bending at the waist. It is better form and safer.

3) Where to read the full rules. Sometimes people slip through the crack and aren't taught the full rules, or the generally accepted interpretations of odd situations. This can cause them to be seen as cheating, even if they were fighting to their best understanding of a rule. Make sure to explain to new fighters that the rules get more complicated and direct them to belegarth.com or geddon.org for the full rules. Having a copy of the Book of War on hand might also prove useful.

4) Who they can talk to. New fighters are less inclined to seek out veterans unless they know them a little. Make sure to point out good people to ask for help, whether it be a herald, knight, squire, or some other easily recognizable person.

5) Be on the same page. You really want to make sure those that are doing the recruiting have the same understanding of the rules and a rough plan for what rules to focus on. Use the time provided by summer to get everyone up to speed and trained, if need be.

---

I'm sure there are many more, but hopefully those few tips will help you recruit some new fighters and keep them in the swing of things.  I'll do a post closer to next school year with the talking points I use for recruiting.

Thursday, May 15, 2014

Decisive Action: Envelopment

My crudely drawn diagrams will eventually get better, I promise.

All of you experienced veterans of Belegarth are well aware that full encirclement of an enemy force is extremely rare and hard to pull off in our game. The scale is too small, allowing each person greater awareness of the big picture. The forces are generally too evenly matched in skill and numbers for one side to have enough of an advantage to attempt such a difficult maneuver.

The only time we usually see full encirclement is during the cleanup phase of battle. Well after the decisive action, a group of mobile fighters will encircle a group of wounded (legged) opponents. Not exactly as epic or decisive as the Battle of Cannae.


File:Battle cannae destruction.gif
Source: The Department of History, United States Military Academy.  Copied from Wikipedia.

So why talk about it? Because a smaller scale of it happens all the time. One of the most useful tools in a commander's playbook is the kill pocket. The simple change in formation requires a few fighters to step back off of the line, forming a U shape. Any enemies inside the U are easy targets, even if they aren't fully encircled. Kill pockets are widely used to defend bridges and castle entrances, or to attempt to lure support weapons into the trap.

The reason a kill pocket works, is because those in the middle have to fight against three directions. It is nearly impossible to defend against spears and support weapons coming from both sides and the front, let alone deal with the shieldmen protecting them. By concentrating their attacks towards the middle, those using the kill pocket can cut a hole through the enemy line, causing a major breakthrough.  Of course, in the open, those on the top of the U are somewhat more exposed and must defend themselves from opponents on two sides--those inside the pocket and those in front of them.  It is important for those fighters to fight defensively and keep the edges of the pocket intact, otherwise the enemy might take advantage of this weakness and push against them.

On the open field, wise commanders will spot the trap, and either pull their forces out of the kill pocket, or deploy shock troops and reserves to press into it. If that second option sounds dangerous, that's because it can be. Depending on the composition of the pocket, sometimes those at the bottom of the U are stretched thin enough that a burst of shock troops can break through. This is extremely effective when the defenders don't have reserves, allowing your team to press through the pocket and roll the enemy flanks from the center in a major breakthrough.

Source: Crudely drawn diagrams.  Blue dots are standing in for attackers (aka, the good guys).

Another fairly common sight is aggressive or heavy flanking forces rolling around a flanks, causing the enemy wing to bend backwards. Usually, it is preferable to have the wing extend to stop flankers, but a strong rush of them is often enough to force the wing into the defensive. In extreme cases, the line will curl backwards on itself enough that the main line and wing are standing nearly back to back. At this point, even if they aren't fully encircled, the defenders are going to be cut down in short order.

For the defenders, their first option of extending the line gone, need to choose a new plan quickly. Everyone that will soon be encircled can fall back, reforming a shorter, stronger line and fight the flankers. This will sometimes work, but it requires those on the wing and core to be aware of the danger early. The other option is to pressure the opposite flank hard, ideally bending it back in equal measure. This causes the two lines to rotate around the middle and allow the line to reform before being crushed. Of course, they'd have to act quickly to overcome the challenge, otherwise the center may not have enough time to escape.

More Dots!  Blue dots are trying to salvage the line and regroup against a strong enemy flank.
 

In general, try to keep your own line strait across the field.  When you need to add a bend to your line for any reason, try to make sure that you are causing the enemy to fight against multiple directions without exposing your backs--don't curl back upon your own line.  Kill pockets are useful, but do have weaknesses on the edges.  Try to use them more when the enemy has to come through the middle.  For those newer fighters, instead of retreating back behind your line, try spreading out away from them--maintaining decent spacing.  Your team would much prefer it if you didn't escort the enemy into the backfield as you retreated.


Monday, May 12, 2014

Of Knights and Squires

This is a rant, and one of a very idealistic view. Be warned.

The term "knight" gets thrown around a lot in Belegarth. The importance of the title varies from place to place, person to person. There are joke knights, self-proclaimed knights, and a few peerage systems all spread throughout the sport. We have no true national idea of knighthood, but the seeds of it exist in the commonality between the individual lineages.

The role of a knight in my mind, and many others, is primarily to be a realm leader. They are not only a skilled fighter that can lead the charge, but an administrator and teacher that the realm can rally behind. Realm leadership varies from place to place, some dictatorships or pure democracies, or even ran by a council. Even if a knight has no place in a realm's administration, they can still be a valuable resource for the realm in terms of service, education, and recruitment.

Some people instantly assume the squire process is strictly about building better fighters and having minions to run events. The real goal, however, is to mold a squire into a well rounded knight by ironing out their weaknesses and bolstering their skills across the board. Service, fighting, leadership, and crafting are just a few of the skills needed to be developed. By the time they are knighted, a squire should be able to go anywhere, recruit fighters, start a realm, and help get them trained and equipped.

Knowledge is the cornerstone of the squire path. They must seek to be experts on the sport, because that is what others will expect of them when they have the title of Knight. Knights then act as a guide to the next generation, passing on what they have learned.

Due to the nature of the knight/squire relationship, each squire will follow their own path, seeking to iron out their own weaknesses and pursue their personal goals. This leads to each knight having their own unique skill set and focus, but not necessarily conforming to the ideal vision of knighthood. That means that knighthood is not the end of a journey, but a waypoint or milestone. Knighthood should be seen as proving you are a champion of the sport, working to build and grow it.

Title gained, we must each strive to reach that ideal vision of knighthood. To do otherwise is to stagnate the development of the sport.

Saturday, May 10, 2014

The Glorious Charge of Macintosh

Any embellishment in this story is entirely accidental. A few of the details have slipped by over the years.

A friend's recent post got me to reminisce about the good old days of the local realm. Plenty of great stories and fond memories. Over the years, you get the witness quite a few cool fights and epic/funny moments. The talk of Hiedoran reminded me of one I love to tell from several years ago.

At the time, I was a young fighter at my second or third Oktoberfest. I had spent the bulk of the day heralding. While I really wanted to fight, heralding did give me a great chance to watch some good fights. I was there to witness the carnage caused by Macintosh and his charge into the enemy, glaive in hand.

For those of you who have never had the privilege of meeting him, Macintosh aka Mac, was the leader of Hiedoran. Soft spoken, easy going, and probably one of the nicest people you can meet, he had built up a sizable force from newer fighters. Despite being a little older and less fit than the average Belegarth fighter, he had developed a knack for glaive fighting and polearm formations.

On a typical day, most of Hiedoran's shieldmen were less experienced, resulting in the enemy doing their best to charge Mac and try to reduce the unit's damage output. This wasn't the case this day. Realm battles had been called, and the Knights of Numenor were out in force at that event. They formed up a strong flank along the edge of the field and gave Mac a strong shield wall to work with.

I was heralding near the middle of the fight, watching that side of the field. It started out like a typical battle. The different groups maneuvered and slowly engaged. Numenor was hit pretty hard, to be expected in those days. Mac's glaive went to work, hacking legs, breaking shields, and stabbing down the enemy. The knights rallied to his side, protecting him from arrows and onrushing foes alike.

The tempo of death dealing quickened as he began to break open a gap in the enemy line. Out of the wall of shields burst Mac, fury in his eyes and all the signs of overdoing it. The nicest guy I know was on a rampage, so caught up with his task at hand that those guarding him were running to keep pace. His angry, focused expression alone may have been enough to break the enemy resistance, but his glaive was happily leaving a trail of death behind him.

As to the final tally of dead, I am unsure. Those that fought along side him claimed that they didn't even have to swing their swords. The story has been retold many times, but each retelling fails to capture how truly epic it was.

Thursday, May 8, 2014

Decisive Action: the Basics

I'll be out of town next week, so chances are there won't be any posts until the following week.

Decisive action is the heart of my theory on how to win line battles. Traditional military thinkers base much of their conclusions on mission objectives and success on much larger scales. Much of that rarely applies to even the largest Belegarth battle, where the primary objective is annihilation of the enemy, regardless of casualties. Even for objective play, like capture the flag, causing attrition in the enemy ranks usually overcomes concerns related to the objective. They can't capture your flag if they are dead.

The theory of decisive action is all about swaying the tide of battle in your favor and preventing the enemy from doing so. Whether it be a well timed rush, successful flankers, or careful line positioning, the goal is to out kill the enemy. One flanker making it into the enemy's backfield can kill a disproportionately large number of enemies, getting him there is decisive action.

At its simplest form, decisive action is attrition, merely out fighting the enemy till they reach the breaking point. In a stand up fight with equal numbers and skill, decisive action usually starts with the first person to claim victory against one enemy, now free to help his allies. This allows the team to quickly build up an advantage and outpace the enemy, as freed fighters group up and kill individuals faster.

At its most complex, decisive action is a combination of all of the different decisive actions across the whole line. At this point, victory is determined much by how well a team prevents decisive actions. Proper use of reserves can prevent a flanker from having a full run at your backfield or stop an onrush through a gap. It is this type of action that wins the race of attrition.

The types of decisive action can be broken down into the following:

Attrition--killing more than you lose.
Flank Crush--Flankers rolling around and causing a spike in attrition.
Envelopment--Surrounding the enemy.
Minor Breakthrough--One or two fighters getting through the line.
Major Breakthrough--Whole section getting through the line.
Overrun--entire line pushing through the enemy.

Causing and preventing each of these will determine the outcome of battle. Over the coming weeks, I'll look more in depth at each one and how to cause/prevent it, and how the different roles on the battlefield come into play.

Monday, May 5, 2014

Event Schedules

This is in no way intended to be an shot at anyone who has ran an event, just constructive criticism to help improve future events. There are many events that have had issues cramming everything into the course of a few days, including ones I've been involved in running. Part of what leaves a lasting impression of a good event is quality field fighting, especially for people that have day tripped. Keeping the field active for as long as possible will make for a better event.

 Let me point out a few things that commonly can cause trouble for your schedule.

Weapons Check

Getting weapons checked and on the field gets fighting started. The soon you get it open, the sooner people can take the field. Not everyone is going to want to be up early, but you'll find plenty of people up and around that will need gear checked. Post the time at troll and there will be plenty of people stopping by early. Every person you can get through weapons check before 10 am makes way for someone day tripping or sleeping in.

Make sure that the busiest day of your event, usually Saturday, has some of your most experienced checkers assigned to cover it. Pausing to recheck weapons that shouldn't have failed or answer questions from less experienced checkers can slow down the process. If you have less experienced volunteers, try to train them ahead of time (before the event if possible).

Trials

We all want to see our friends get knighted. Most squires have a lot of friends by time they are ready to be knighted. That means that a sizeable amount of veteran fighters are going to leave the field to watch/participate. Depending on the size of the event, this has a good chance of killing fighting for everyone else, easily going from a 200+ person event to a large practice.

To minimize the impact of knightings, and other promotions, try to schedule them off of peak fighting times. Saturdays should be avoided, if possible. If it has to be done on Saturday, it is better to either start early or towards dark (if lighting permits). The goal is to ensure that fighting was going to taper off anyway or have time to ramp back up afterwards. Weapons checkers should be able to expedite checking of weapons needed for trials to get them started earlier.

To improve the overall experience, take advantage of the smaller field size during trials to run bridge or castle battles. This will keep the smaller numbers fighting at a higher intensity than a normal practice. Once trials are over, have a plan to lure fighters back to the field, like having realm/unit battles.

Always try to avoid overlapping trials. Work with those involved ahead of time to see how you can space them out. Multiple units having trials and promotions at the same time is multiple units off of the field. If you know several groups are wanting to have their trials at your event, consider renting lights and setting aside time after/during feast.

Feast

Ahh, feast, the bane of most event coordinators. There will almost always be someone complaining about it (look, even I'm doing it). It is either too late, under cooked, over cooked, or the line is too long. One thing that is sometimes overlooked is how having feast too early kills fighting. The sort of ideal time is right at dark, leaving as much sunlight for fighting and food prep, without leaving people hungry.

Remember, people that day trip to events van easily spend 6 hours driving the day of the event, they're going to want to get in as much fighting as they can. They will be more likely to make the trip again (maybe even to camp) if they had a great day at your event.

Thursday, May 1, 2014

Armored Up

First off, armor is awesome. Looks good, keeps you in the fight, and keeps that medieval theme going. A lot of newer fighters really want armor for an extra hit where they get hit most often. This actually has the potential to be detrimental to their development, as they are relying on armor to compensate for missing technique or a flawed guard. Learning how not to get hit there is of far greater value. This is a problem I see more often with first or second year fighters.

By time a fighter has reached a certain level of skill, armor becomes a safety net. It becomes that extra hit needed to overcome a hard fight or multiple opponents. Armor at this point also serves to reduce the impact of backstabbing and support weapons on an otherwise decent line fight. A fairly large chunk of the sport uses armor in this fashion, as passive defense.

Ideally, if you've developed a talent for fighting, you can defend yourself well enough to not rely on armor for survivability. Footwork keeps those greaves from getting hit. Good blocking and safe swings keep your arm armor intact. Shield work and every thing else combines to save your torso armor.

So, you've got all this armor and enough skill to stay alive fairly well, but what purpose is the armor serving now? It becomes a tool, a weapon to use, rather than passive defense. Those well practiced in armored combat will actually sacrifice hits on their armor to gain an advantage. Several high risk attacks now become more advantageous, with the knowledge that your armor will take the hit.

This is a bit of a slippery slope, however. It isn't worth throwing a risky shot when a safe one would have done the job. It also could build bad habits when fighting without armor. Intentionally allowing your armor to be hit should only really be used to gain an advantage that is otherwise difficult to gain.

One of my favorite tricks to use armor offensively is against a legged opponent. Raising my greave to block their angle of attack and force a hit to the armored leg allows me a chance to hit their exposed arm. That's a pretty fair trade. Doing the same without armor takes a little bit of good timing, but armor lets you get away with an aggressive attack and end the fight relatively unscathed.

That's just one of many examples (can't give away all of my tricks). The point is, don't look at armor as a "just in case" or a necessity for survival, think about how you can use it as another part of your arsenal, just like a sword or shield.

Also, make/wear more armor. It makes the sport look better.

Anatomy of a Line: Flankers, Shock Troops, and Reserves

I talked a bit about the anatomy of a line last week. Today we're going to look at flankers, shock troops, and reserves. All three require that a strong line has already been established. These three are usually only seen at events or large practices, when the number of fighters on the line won't miss their absence. I'll be piecing it all together in post about decisive action next week.

Flankers

As far as equipment goes, those that fight on the flank generally prefer mobility. Short, light weapons and punch shields are most common. Armor is usually scarce on the flanks, but a few pieces here and there aren't unheard of. Support weapons rarely flank, unless part of a larger force. Side note: if you've never tried flanking in full armor with a longsword, it will be tiring, but fun.

If you are going to flank, it is essential to work off of your line, and have at least some awareness of where the wing anchor is. Your first task is defending them from being flanked. After that, they can usually offer you some assistance by pinning a few of the enemy in place for you. On the other side, sometimes they can help you, should you get bogged down by the enemy flankers, by flanking them for you. This marks the most common transition between roles, switching between flanker and anchor.

Mobility is key for flankers. Getting a leg hacked off far away from the line will quickly put an end to any flank attack. Flankers should avoid being strung out too far from the enemy line so they can still be a threat from a knee. In general it is going to be preferable for them to lose an arm than a leg.

Reserves

Reserves are rare in normal practices, but become somewhat common in larger events and around choke points (bridges or castles). In smaller scales, archer guards are the most common reserves seen. Besides their goal of protecting the archer, they will act as a lookout and last line if defense against flankers that have made it behind their line. In larger fights, the reserves may be a sizable force, ready to push against a gap or fill in where casualties are high.

Those in reserve have a mixed selection of equipment. Support weapons wait here to spot a good area to engage. Experienced fighters will sometimes stay in reserve in order to get better perspective on the enemy situation, often taking a leadership role. Unarmored and shieldless fighters may stay in reserve to avoid concentrations of spears or archers.

Shock Troops

When the line is about to break or the enemy is on the verge of breaking, shock troops are what turn the tide. Medium to heavy armor, and/or high speed, combined with good battlefield awareness make them ideally suited to bolster your own line or pick apart the enemy. While usually a fairly experienced fighter, a keen eye for gaps in the enemy line, or your own, is more essential.

Shock troops are often either in reserve or take a place among the line. They switch to the role of shock trooper when decisive action needs to be taken, pushing into the heart of the enemy line. They fulfill a need similar to flankers, but concentrate their efforts towards the thick of fighting. Support weapons may be deployed in this role, stifling an enemy advance or breaking a weaker section of their line.

Whole groups of fighters can also be used as shock troops. Five to ten fully armored fighters with large shields charging into your line in a tight formation can have big impact (looking at you, Uruk-hai). In these situations, the group is often trying to force decisive action, even when no obvious opportunities present themselves.